How to draw a zombie
How to draw a zombie
How to draw a zombie. The zombie is a corpse that would have been renewed by witchcraft. Beliefs about zombies vary widely from religion to religion. However, zombies with different beliefs share the same behavior: they crave human flesh and can turn a human into a zombie once that person is bitten. The sinister appearance of zombies and the mystery of their existence make them very interesting to draw. However, drawing a zombie can seem like a big challenge due to its complex features.
Fortunately, we’ve created a step-by-step process on how to draw a zombie, broken down into nine simple steps. Each instruction comes with an illustration as a visual guide, making the whole process easy for you! Have fun, and use your creativity to draw a scary zombie! If you are looking for some cute drawings, drawing for kids, cartoons drawing, animals drawing and many more, then you are at the right place.
Drawing a zombie
Step 1:
Starting at the top of your paper, draw a square with curved edges to create the zombie’s head. Next, draw a semicircle on either side of the zombie’s head to form its left and right ears. To ensure that the zombie is drawn in the center, you can create reference lines by drawing horizontal and vertical line that intersects.
The vertical line above the horizontal line is where you should define the head. By drawing the head up, there will be enough room for the zombie’s entire body at the bottom of the paper.
Step 2:
The space between the lines depends on how thick you want the zombie’s torso to be. The more significant the gap, the stronger the zombie will look. Next, draw a horizontal line at the bottom, connecting the two ends of the vertical line. It represents the shirt the zombie is modeling. Zombies often wear damaged and dirty clothes, so don’t forget to add several curved lines to create tears in the bottom hem of the shirt!
Step 3:
Draw two diagonal lines under the zombie’s shirt. Then draw a slightly curved horizontal line connecting the two ends. This forms the zombie’s lower body. Then add a short vertical line from the bottom to the middle of the lower body. Then draw an upward curve at the top of the vertical line. This creates a separation between the left leg and the right leg.
Step 4:
Just below each pant leg, draw a curved line with a horizontal line at the bottom to create a pair of shoes. As you can see in the illustration, the zombie’s feet are pointing in opposite directions.
Step 5:
Complete the zombie’s shirt by drawing a curved line down its neck, forming the collar. Then draw a diagonal line with a horizontal line down each side of the zombie’s body to create the sleeves of the shirt he is wearing. Don’t forget to add some rips to the neck, hem, and sleeves! This creates the illusion of damaged clothing, which makes your drawing look more realistic!
Step 6:
Draw an arm with one hand under each sleeve. We think the easiest way to draw a hand is to draw it as a fist, so that’s exactly what we’ve done in this step. Draw an irregular circle shape with edges, then draw a few lines inside, forming the thumb.
Step 7:
For extra dramatic effect, draw an ax hitting the top of the zombie’s head. Since the ax was struck in his skull, the blade would not be entirely visible. Zombies are individuals who own risen from the finished. This means that the cause of his death remains obvious. In this case, this zombie was attacked with a sharp axe. It’s pretty brutal. However, that’s what makes the zombie scarier!
Step 8:
Moving on to the facial features, proceed by drawing two circular shapes to create the eyes. Then draw a smaller circle shape at different positions inside each eye. This creates the pupil of the eyes. Shade the entire pupil leaving a small circle inside without shading. Don’t forget to add some lines around the eyes to create the look of wrinkles! Then draw a shape that forms the mouth of the zombie. Inside the mouth, draw a curved line at the bottom for the tongue and square shapes at the top for some visible teeth. Don’t worry if the eye shapes are not entirely identical! The more uneven they are, the scarier the zombie’s facial expression will be.
Step 9:
Make your design more dramatic by adding a few different patterns and details here and there. Trace the line at the top of the head with several short lines to create the illusion of a stitched wound.
This is how you can make your drawing of zombies even better…
Rise to the occasion as we make your zombie sketch all it can be with these fun lifehacks! We kept the pose quite simple for this zombie drawing to make it easier for you. Now that you’ve finished the design, you can tweak the pose slightly to make it more dynamic! For example, zombies are often depicted walking with their arms outstretched in front of them. It would be pretty easy for you to describe in this one. This is an example, but what other fun poses do you think you want to add to this image?
We also simplified the details of this zombie drawing a bit, but you can add a few more! For example, you might want to add more facial features and details to make it more expressive. You could even depict this zombie in a completely different art style! It depends on your preferences and what you like to draw, so have fun experimenting. Now that you’ve mastered this particular zombie sketch, you can use what you’ve learned to create more characters. You could turn him into a swarm of zombies by adding many more friends! You can do this by going back over the steps in the guide and adding various unique details and features. Or, you can draw terrified living figures running from the zombie.
They could even be drawn in the same style as the zombie we created. What kind of situations would you like to create? You can finish with a background when you’ve edited and added all the details you want. There are a few settings that would be perfect for this drawing of zombies! Some examples might show a spooky graveyard the zombie just emerged from. Or maybe venture into an unsuspecting town. These are just a few examples, but there are so many fun backgrounds you could create!
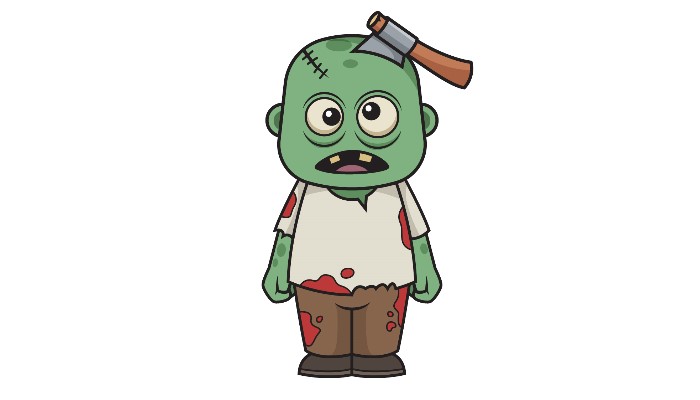
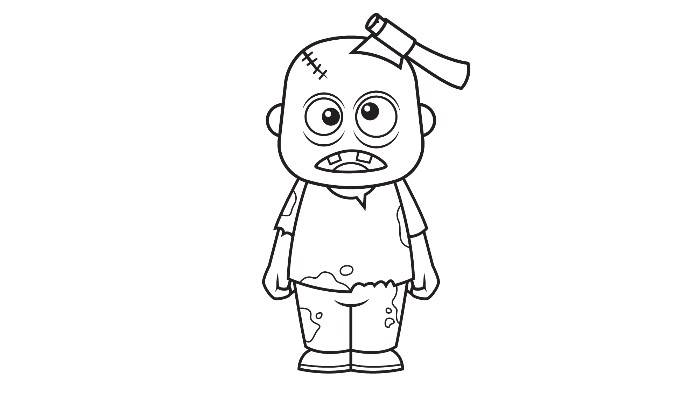
Your zombie drawing is complete!
If you liked this drawing tutorial, you might also like drawing a fairy, a goblin, and other mythical creatures! Go ahead and check our “How to Draw” catalog for many more fun drawing tutorials like this. Which legendary creature would you like to draw next? Once you’ve finished drawing and coloring a zombie, don’t forget to show off your masterpiece!
Also Read: Top 10 Canadian Hospitality Jobs